Running Examples
A pipeline used on epidemiological surveillance
In this section we present a pipeline used on epidemiological surveillance. The aim is to characterize bacterial strains through allelic profiles . When sequencing a bacterial strain by paired end methods with desired depth of coverage of 100x (in average each position in the genome will be covered by 100 reads), the output from the sequencer will be two FASTQ files containing the reads. Each read typically will have 90-250 nucleotides length, using Illumina technology. The first data processing step is to trim the reads for removing the adapters used in the sequencing process and any tags used to identify the experiment in a run.
In de novo assembly, software such as Velvet is used to obtain a draft genome composed of contigs, longer DNA sequences resulting from assembling multiple reads. The draft genome can be compared to databases of gene alleles for multiple loci using BLAST. Given BLAST results we can create an allelic profile characterizing the strain.
Pipeline "Github" "https://github.com/ngspipes/tools" {
  tool "Trimmomatic" "DockerConfig" {
    command "trimmomatic" {
      argument "mode" "SE"
      argument "quality" "-phred33"
      argument "inputFile" "study1/ERR406040.fastq"
      argument "outputFile" "ERR406040.filtered.fastq"
      argument "fastaWithAdaptersEtc" "study1/TruSeq3-SE.fa"
      argument "seed mismatches" "2"
      argument "palindrome clip threshold" "30"
      argument "simple clip threshold" "10"
      argument "windowSize" "4"
      argument "requiredQuality" "15"
      argument "leading quality" "3"
      argument "trailing quality" "3"
      argument "minlen length" "36"
    }
 }
  tool "Velvet" "DockerConfig" {
    command "velveth" {
      argument "output_directory" "velvetdir"
      argument "hash_length" "21"
      argument "file_format" "-fastq"
      chain "filename" "outputFile"
    }
    command "velvetg" {
      argument "output_directory" "velvetdir"
      argument "-cov_cutoff" "5"
    }
  }
  tool "Blast" "DockerConfig" {
    command "makeblastdb" {
      argument "-dbtype" "prot"
      argument "-out" "allrefs"
      argument "-title" "allrefs"
      argument "-in" "study1/allrefs.fna.pro"
    }
    command "blastx" {
      chain "-db" "-out"
      chain "-query" "Velvet" "velvetg" "contigs_fa"
      argument "-out" "blast.out"
    }
  }
}
Example 6.1: A pipeline used on epidemiological surveillance.
A visual representation of this pipeline described in Example 6.1 is presented in the Figure 6.1. Moreover, in this figure is also possible to observe other execution orders that are feasible to execute this pipeline in the engine for workstation.
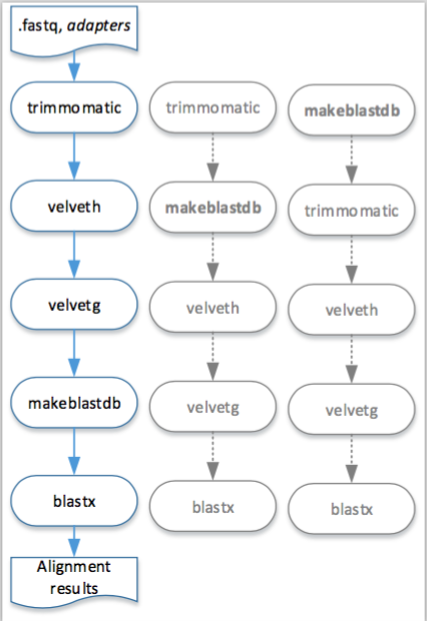
Figure 6.1: Visual representation of the execution, in the engine for workstation, of the pipeline described in Example 6.1.
In the engine for cloud, different steps of the pipeline can be executed in different machines, it is only necessary to respect its depedencies, as it is shown in the Figure 2.2.
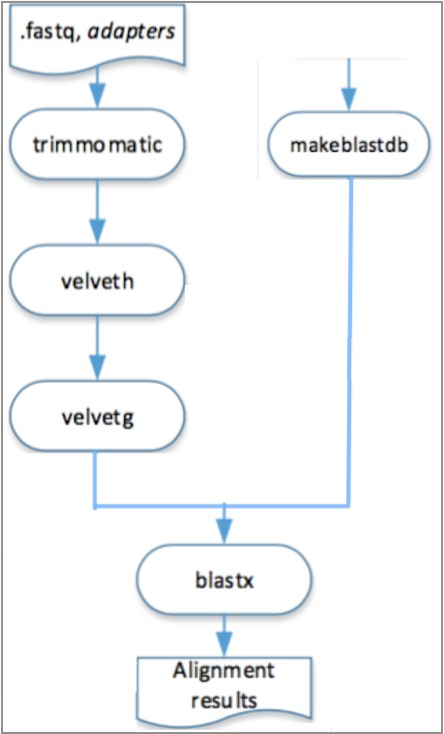
Figure 6.2: Visual representation of the execution, in the engine for cloud, of the pipeline described in Example 6.1.
Input data is available here
Running this example in Engine for workstation
Note Please, be sure that the Engine for Workstation is already installed. For this, follow the steps that are in section:
Engine->Engine for Workstation-> Install engine for workstation.
Since the engine for workstation is provided as a console application or a graphical user interface application, we will describe how to do with the console application (for more information on how to user the graphical user interface, please look at the section: Engine->Engine for Workstation-> Run engine for workstation.
- After the installation, you should have the following tree file:
  WD
    |-- engine-1.0\
       |-- NGSPipesEngineExecutor\
          |-- NGSPipesEngineExecutor.vbox
          |-- NGSPipesEngineExecutor.vdi
       |-- bin\
          |-- engine        (CUI OSX/Linux run script)
          |-- engine.bat    (CUI Window run script)
          |-- engine-ui     (GUI OSX/Linux run script)
          |-- engine-ui.bat (GUI Window run script)
       |-- lib\
          |-- ...
    |-- (other files, ...)
- Download the data available here
- After unzipping, the directory content look like, for instance,
/home/ngspipes/study1
   |-- allrefs.fna.pro
   |-- ERR406040.fastq
   |-- NexteraPE-PE.fa
   |-- TruSeq2-PE.fa
   |-- TruSeq2-SE.fa
   |-- TruSeq3-SE.fa
   |-- TruSeq3-PE-2.fa
   |-- TruSeq3-PE.fa
   |-- TruSeq3-SE.fa
- Create a file
casestudy1.pipes(.pipesis the extension containing the pipeline previously described in Figure 6.1. Assume that, on the followingcasestudy1.pipesis inside the directorystudy1. - Create the
outputsdirectory (/home/ngspipes/outputs) - Execute the engine at your working directory using the following command line:
Windows
c:\ngspipes>engine-1.0\bin\engine.bat -in c:\ngspipes\study1 -out c:\ngspipes\outputs -pipes c:\ngspipes\casestudy1.pipes
OSX/Linux
ngs@server:/home/ngspipes$engine-1.0/bin/engine -in /home/ngspipes/inputs -out /home/ngspipes/outputs -pipes /home/ngspipes/casestudy1.pipes
Example and description of output messages
Initial steps of the output will look like this:
Loading engine directories
Loading engine resources
Using classpath C:/Users/user/NGSPipes/Engine/dsl-1.0.jar;
               C:/Users/user/NGSPipes/Engine/repository-1.0.jar
Getting engine requirements
Getting clone engine
Clonning engine
...... Clonning engine
...... Clonning engine
...... Clonning engine
...... Clonning engine
...... Clonning engine
...... Clonning engine
Configurating engine
Starting execute engine
Booting engine and installing necessary packages
...
Note that the cloning step only happens in the first execution of the engine. On the other hand, when a tool is used for the first in any pipeline, the engine will automatically download and install the corresponding Docker image. An example of output for when this is necessary is presented for the Trimmomatic tool:
...
TRACE    :: STARTED ::
TRACE   Running -> Step : 1 Tool : Trimmomatic Command : trimmomatic
INFO    Executing : sudo docker run -v /home/ngspipes/Inputs/:/shareInputs/:rw -v
                            /home/ngspipes/Outputs/:/shareOutputs/:rw
                        ngspipes/trimmomatic0.33 java -jar trimmomatic-0.33.jar SE
                        -phred33 /shareInputs/ERR406040.fastq /shareOutputs
                        ERR406040.filtered.fastq
                        ILLUMINACLIP:/shareInputs/adapters/TruSeq3-SE.fa:2:30:10
                        SLIDINGWINDOW:4:15 LEADING:3 TRAILING:3   MINLEN:36
INFO    Unable to find image 'ngspipes/trimmomatic0.33:latest' locally
INFO    latest: Pulling from ngspipes/trimmomatic0.33
INFO    511136ea3c5a: Pulling fs layer
INFO    e977d53b9210: Pulling fs layer
INFO    c9fa20ecce88: Pulling fs layer
...
INFO    6cf3f4911f80: Download complete
INFO    Digest: sha256:44f1dea760903cdce1d75c4c9b2bd37803be2e0fbbb9e960cd8ff27048cbb997
INFO    Status: Downloaded newer image for ngspipes/trimmomatic0.33:latest
INFO    TrimmomaticSE: Started with arguments: -phred33 /shareInputs/ERR406040.fastq
                            / shareOutputs/ERR406040.filtered.fastq
                            ILLUMINACLIP:/shareInputs/adapters/TruSeq3-SE.fa:2:30:10
                            SLIDINGWINDOW:4:15 LEADING:3 TRAILING:3 MINLEN:36
...
Note that this tool was previously dockerized by the NGSPipes team. For other tools, such as Velvet or Blast, there is already public Docker images which the example pipeline uses.
When the execution finish, the following files will be at the working directory:
home/ngspipes/outputs
   |-- allrefs.phr
   |-- allrefs.pin
   |-- allrefs.psq
   |-- blast.out
   |-- filtered.fastq
   |-- velvetdir/
      |-- Log
      |-- Roadmaps
      |-- Sequences
      |-- contigs.fa
      |-- LastGrpah
      |-- stats.txt
Running this example in Engine for Cloud
Note Please, be sure that the Engine for Cloud is already installed. For this, follow the steps that are in section:
Engine->Engine for Cloud-> Install engine for cloud.
If previously installed, please ensure that:
- the ip of the virtual machine is configured
- the environment variable is stablished on the terminal that you are executing the monitor. For managing these settings, please also consult the section:
Engine->Engine for Cloud-> Install engine for cloud.
After the installation, you should have the following tree file:
  WorkingDirectory
    |-- Analyser\
       |-- ngs4cloud-analyser-1.0-SNAPSHOT\
          |-- bin
              |--ngs4cloud-analyser
              |--ngs4cloud-analyser.bat (CUI Window run script)
    |-- Monitor\
       |-- monitor.jar
    |-- (other files,...)
- Input data is available here, but is not necessary to download. Input data in Engine for Cloud engine is always passed as an URI.
- Create a file
casestudy1.pipes(.pipesis the extension containing the pipeline previously described in Figure 6.1. Assume that, on the following,casestudy1.pipesis inside the directoryngs4cloud-analyser-1.0-SNAPSHOT. - Start by execution the analyser tool, in order to produce an file with
jsonextension.
OSX/Linux
ngs@server:ngs4cloud-analyser-1.0-SNAPSHOT$ ./bin/ngs4cloud-analyser analyse
    -pipes casestudy1.pipes
    -ir ir1.json
    -input https://www.dropbox.com/s/h8e8t3prt9f0gq3/study1.zip?dl=0
    -outputs blast.out velvetdir/contigs.fa
- This execution will produce the file
ir1.json. - Then, copy the
ir1.jsoninside to directoryMonitor - Before executing the Monitor, please assure that the Virtual Machine with the cluster image given for test purposes is lauched and correctly settled (please, see the section
Engine->Engine for cloud->
    Install the engine for cloud -> Install the monitor
- Launch the pipeline into the cluster through the monitor command
ngs@server:Monitor$ java -jar monitor.jar launch ir1.json
- The previous command with generate a pipeline
id. Assume in this example that the id is 1. - Consult the status of the pipeline by its id
ngs@server:Monitor$ java -jar monitor.jar status 1
- After pipeline is finished, it is possible to download its results from the cluster to a previously defined directory inside the
Monitordirectory.
ngs@server:Monitor$ java -jar monitor.jar outputs 1 resultsDirectory
resultsDirectoryis the directory that contains a copy of the outputs that where previously specified by the analyser that should be copied;1is the pipelineìd
For more information about the analyser and monitor commands and its parameters, please see section
Engine->Engine for cloud->Run the engine for cloud
A pipeline used on ChiP-Seq analysis
In this section we present a pipeline used on ChiP-Seq analysis. This pipeline includes mapping with bowtie2, converting the output to bam format, sorting the bam file, creating a bam index file, running flagstat command, and removing duplicates with picard. So, this pipeline can be used in a ChiP-Seq pipeline that uses the resulting bam file for peak calling and creating heatmaps. Since those steps are generic that can be used for ATAC-Seq analysis too.
Pipeline "Github" "https://github.com/ngspipes/tools" {
    tool "Bowtie2" "DockerConfig" {
        command "bowtie2-build" {
            argument "reference_in" "study2/sequence.fasta"
            argument "bt2_base" "sequence"
        }
    }
    tool "Bowtie2" "DockerConfig" {
        command "bowtie2" {
            argument "-U" "study2/SRR386886.fastq"
            argument "-x" "sequence"
            argument "--trim3" "1"
            argument "-S" "eg2.sam"
        }
    }
    tool "Samtools" "DockerConfig" {
        command "view" {
            argument "-b" "NA"
            argument "-o" "eg2.bam"
            chain "input" "-S"
        }
    }
    tool "Samtools" "DockerConfig" {
        command "sort" {
            argument "-o" "eg2.sorted.bam"
            chain "input" "-o"
        }
    }
    tool "Picard" "DockerConfig" {
        command "MarkDuplicates" {
            chain "INPUT" "-o"
            argument "OUTPUT" "marked_duplicates.bam"
            argument "REMOVE_DUPLICATES" "true"
            argument "METRICS_FILE" "metrics.txt"
        }
    }
}
Example 6.2: A pipeline used on ChiP-Seq analysis.
A visual representation of this pipeline is presented in the next figure.
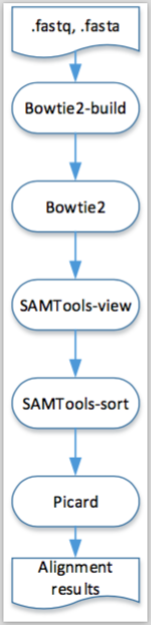
Figure 6.2: Visual representation of the execution, in both engines, of the pipeline described in Example 6.2.
Running this example in Engine for workstation
Similar to the prevous example.
Running this example in Engine for Cloud
It is similar to the previous example.
Note Please, be sure that the Engine for Cloud is already installed. For this, follow the steps that are in section:
Engine->Engine for Cloud-> Install engine for cloud.
If previously installed, please ensure that:
- the ip of the virtual machine is configured
- the environment variable is stablished on the terminal that you are executing the monitor. For managing these settings, please also consult the section:
Engine->Engine for Cloud-> Install engine for cloud.
After the installation, you should have the following tree file:
  WorkingDirectory
    |-- Analyser\
       |-- ngs4cloud-analyser-1.0-SNAPSHOT\
          |-- bin
              |--ngs4cloud-analyser
              |--ngs4cloud-analyser.bat (CUI Window run script)
    |-- Monitor\
       |-- monitor.jar
    |-- (other files,...)
- Input data is available here, but is not necessary to download. Input data in Engine for Cloud engine is always passed as an URI.
- Create a file
casestudy2.pipes(.pipesis the extension containing the pipeline previously described in Figure 6.2. Assume that, on the following,casestudy2.pipesis inside the directoryngs4cloud-analyser-1.0-SNAPSHOT. - Start by execution the analyser tool, in order to produce an file with
jsonextension.
OSX/Linux
ngs@server:ngs4cloud-analyser-1.0-SNAPSHOT$ ./bin/ngs4cloud-analyser analyse
          -pipes casestudy2.pipes
          -ir ir2.json
          -input https://www.dropbox.com/s/filps3qavvhjta7/study2.zip?dl=0
          -outputs metrics.txt
- This execution will produce the file
ir2.json. - Then, copy the
ir2.jsoninside to directoryMonitor - Before executing the Monitor, please assure that the Virtual Machine with the cluster image given for test purposes is lauched and correctly settled (please, see the section
Engine->Engine for cloud->
    Install the engine for cloud -> Install the monitor
- Launch the pipeline into the cluster through the monitor command
ngs@server:Monitor$ java -jar monitor.jar launch ir2.json
- The previous command with generate a pipeline
id. Assume in this example that the id is 2. - Consult the status of the pipeline by its id
ngs@server:Monitor$ java -jar monitor.jar status 2
- After pipeline is finished, it is possible to download its results from the cluster to a previously defined directory inside the
Monitordirectory.
ngs@server:Monitor$ java -jar monitor.jar outputs 2 resultsDirectory2
resultsDirectoryis the directory that contains a copy of the outputs that where previously specified by the analyser that should be copied;2is the pipelineìd
For more information about the analyser and monitor commands and its parameters, please see section
Engine->Engine for cloud->Run the engine for cloud
A pipeline using listing tools
A specific use of NGS data in public health is the determination of the relationship between samples potentially associated with a foodborne pathogen outbreak. This relationship can be determined from the phylogenetic analysis of a DNA sequence alignment containing only variable positions, which we refer to as a SNP matrix. The applications of such a matrix include inferring a phylogeny for systematic studies and determining within traceback investigations whether a clinical sample is significantly different from environmental/product samples.
This case study is a pipeline which combines all the steps necessary to construct a reference-based SNP matrix from an NGS sample data set.The pipeline starts with the mapping of NGS reads to a reference genome using Bowtie2, then it continues with the processing of those mapping (BAM) files using SAMtools, identification of variant sites using VarScan3, and ends with the production of a SNP matrix using custom Python scripts (calling of SNPs at each variant site, combining the SNPs into a SNP matrix). The Python scripts are reused from the CFSAN SNP Pipeline: an automated method for constructing SNP matrices from next-generation sequence data. PeerJ Computer Science 1:e20 https://doi.org/10.7717/peerj-cs.20. As it can be observed in this data set, there are four samples, whose dataflow process is more detailed in the documentation page of this pipeline.
Pipeline "Github" "https://github.com/Vacalexis/tools" {
    tool "snp-pipeline" "DockerConfig" {
        command "create_sample_dirs" {
            argument "-d" "snp-pipeline-master/snppipeline/data/lambdaVirusInputs/samples/*"
            argument "--output" "snp-pipeline-master/snppipeline/data/lambdaVirusInputs/sampleDirectories.txt"
        }
    }

    tool "Bowtie2" "DockerConfig" {
        command "bowtie2-build" {
            argument "reference_in" "snp-pipeline-master/snppipeline/data/lambdaVirusInputs/reference/lambda_virus.fasta"
            argument "bt2_base" "reference"
        }
        command "bowtie2" {
            argument "-p" "1"
            argument "-q" "-q"
            argument "-x" "reference"
            argument "-1" "snp-pipeline-master/snppipeline/data/lambdaVirusInputs/samples/sample1/sample1_1.fastq"
            argument "-2" "snp-pipeline-master/snppipeline/data/lambdaVirusInputs/samples/sample1/sample1_2.fastq"
            argument "-S" "snp-pipeline-master/snppipeline/data/lambdaVirusInputs/reads1.sam"
        }
        command "bowtie2" {
            argument "-p" "1"
            argument "-q" "-q"
            argument "-x" "reference"
            argument "-1" "snp-pipeline-master/snppipeline/data/lambdaVirusInputs/samples/sample2/sample2_1.fastq"
            argument "-2" "snp-pipeline-master/snppipeline/data/lambdaVirusInputs/samples/sample2/sample2_2.fastq"
            argument "-S" "snp-pipeline-master/snppipeline/data/lambdaVirusInputs/reads2.sam"
        }
        command "bowtie2" {
            argument "-p" "1"
            argument "-q" "-q"
            argument "-x" "reference"
            argument "-1" "snp-pipeline-master/snppipeline/data/lambdaVirusInputs/samples/sample3/sample3_1.fastq"
            argument "-2" "snp-pipeline-master/snppipeline/data/lambdaVirusInputs/samples/sample3/sample3_2.fastq"
            argument "-S" "snp-pipeline-master/snppipeline/data/lambdaVirusInputs/reads3.sam"
        }
        command "bowtie2" {
            argument "-p" "1"
            argument "-q" "-q"
            argument "-x" "reference"
            argument "-1" "snp-pipeline-master/snppipeline/data/lambdaVirusInputs/samples/sample4/sample4_1.fastq"
            argument "-2" "snp-pipeline-master/snppipeline/data/lambdaVirusInputs/samples/sample4/sample4_2.fastq"
            argument "-S" "snp-pipeline-master/snppipeline/data/lambdaVirusInputs/reads4.sam"
        }

    }
    tool "Listing" "DockerConfig" {
        command "startListing" {
            argument "referenceName" "reads.sam"
            argument "filesList" "snp-pipeline-master/snppipeline/data/lambdaVirusInputs/reads1.sam snp-pipeline-master/snppipeline/data/lambdaVirusInputs/reads2.sam snp-pipeline-master/snppipeline/data/lambdaVirusInputs/reads3.sam snp-pipeline-master/snppipeline/data/lambdaVirusInputs/reads4.sam"
        }
    }
    tool "Samtools" "DockerConfig" {

            command "view" {
            argument "-b" "-b"
            argument "-S" "-S"
            argument "-F" "4"
            argument "-o" "reads.unsorted.bam"
            argument "input" "reads.sam"
        }
            command "sort" {
            argument "-o" "reads.sorted.bam"
            argument "input" "reads.unsorted.bam"
        }
        command "mpileup" {
            argument "--fasta-ref" "snp-pipeline-master/snppipeline/data/lambdaVirusInputs/reference/lambda_virus.fasta"
            argument "input" "reads.sorted.bam"
            argument "--output" "reads.pileup"
        }
    }
    tool "VarScan" "DockerConfig" {
        command "mpileup2snp" {
            argument "mpileupFile" "reads.pileup"
            argument "--min-var-freq" "0.90"
            argument "--output-vcf" "1"
            argument "output" "var.flt.vcf"
        }
    }
    tool "Listing" "DockerConfig" {
        command "stopListing" {
            argument "referenceName" "var.flt.vcf"
            argument "destinationFiles" "snp-pipeline-master/snppipeline/data/lambdaVirusInputs/samples/sample1/var.flt.vcf snp-pipeline-master/snppipeline/data/lambdaVirusInputs/samples/sample2/var.flt.vcf snp-pipeline-master/snppipeline/data/lambdaVirusInputs/samples/sample3/var.flt.vcf snp-pipeline-master/snppipeline/data/lambdaVirusInputs/samples/sample4/var.flt.vcf"
        }
    }
    tool "snp-pipeline" "DockerConfig" {
        command "create_snp_list" {
            argument "--vcfname" "var.flt.vcf"
            argument "--output" "snp-pipeline-master/snppipeline/data/lambdaVirusInputs/snplist.txt"
            argument "sampleDirsFile" "snp-pipeline-master/snppipeline/data/lambdaVirusInputs/sampleDirectories.txt"
        }
    }
    tool "Listing" "DockerConfig" {
        command "restartListing" {
            argument "referenceName" "reads.pileup"
        }
    }
    tool "snp-pipeline" "DockerConfig" {
        command "call_consensus" {
            argument "--snpListFile" "snp-pipeline-master/snppipeline/data/lambdaVirusInputs/snplist.txt"
            argument "--output" "consensus.fasta"
            argument "--vcfFileName" "consensus.vcf "
            argument "allPileupFile" "reads.pileup"
        }
    }
    tool "Listing" "DockerConfig" {
        command "stopListing" {
            argument "referenceName" "consensus.fasta"
            argument "destinationFiles" "snp-pipeline-master/snppipeline/data/lambdaVirusInputs/samples/sample1/consensus.fasta snp-pipeline-master/snppipeline/data/lambdaVirusInputs/samples/sample2/consensus.fasta snp-pipeline-master/snppipeline/data/lambdaVirusInputs/samples/sample3/consensus.fasta snp-pipeline-master/snppipeline/data/lambdaVirusInputs/samples/sample4/consensus.fasta"
        }
    }
    tool "snp-pipeline" "DockerConfig" {
        command "create_snp_matrix" {
            argument "sampleDirsFile" "snp-pipeline-master/snppipeline/data/lambdaVirusInputs/sampleDirectories.txt"
            argument "--consFileName" "consensus.fasta"
            argument "--output" "snp-pipeline-master/snppipeline/data/lambdaVirusInputs/snpma.fasta"
        }
    }
}
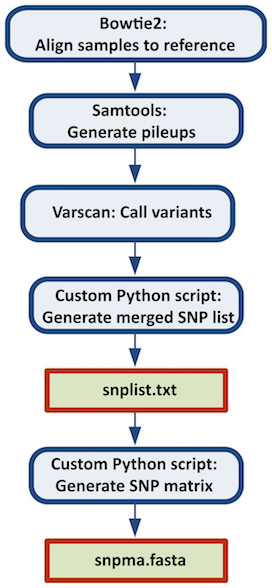
Figure 6.3: Figure from Davis S, Pettengill JB, Luo Y, Payne J, Shpuntoff A, Rand H, Strain E. (2015) CFSAN SNP Pipeline: an automated method for constructing SNP matrices from next-generation sequence data. PeerJ Computer Science 1:e20 https://doi.org/10.7717/peerj-cs.20
Running this example in Engine for Cloud
It is similar to the previous example. Note that this tool types are only avaiable for running in the Engine for Cloud.
Note Please, be sure that the Engine for Cloud is already installed. For this, follow the steps that are in section:
Engine->Engine for Cloud-> Install engine for cloud.
If previously installed, please ensure that:
- the ip of the virtual machine is configured
- the environment variable is stablished on the terminal that you are executing the monitor. For managing these settings, please also consult the section:
Engine->Engine for Cloud-> Install engine for cloud.
After the installation, you should have the following tree file:
  WorkingDirectory
    |-- Analyser\
       |-- ngs4cloud-analyser-1.0-SNAPSHOT\
          |-- bin
              |--ngs4cloud-analyser
              |--ngs4cloud-analyser.bat (CUI Window run script)
    |-- Monitor\
       |-- monitor.jar
    |-- (other files,...)
- Input data is available here, but is not necessary to download. Input data in Engine for Cloud engine is always passed as an URI.
- Create a file
casestudy3.pipes(.pipesis the extension containing the pipeline previously described in Figure 6.3. Assume that, on the following,casestudy3.pipesis inside the directoryngs4cloud-analyser-1.0-SNAPSHOT. - Start by execution the analyser tool, in order to produce an file with
jsonextension.
OSX/Linux
ngs@server:ngs4cloud-analyser-1.0-SNAPSHOT$ ./bin/ngs4cloud-analyser analyse
          -pipes casestudy3.pipes
          -ir ir3.json
          -input https://github.com/CFSAN-Biostatistics/snp-pipeline/archive/master.zip
          -outputs snp-pipeline-master/snppipeline/data/lambdaVirusInputs/snplist.txt snp-pipeline-master/snppipeline/data/lambdaVirusInputs/snpma.fasta
- This execution will produce the file
ir3.json. - Then, copy the
ir3.jsoninside to directoryMonitor - Before executing the Monitor, please assure that the Virtual Machine with the cluster image given for test purposes is lauched and correctly settled (please, see the section
Engine->Engine for cloud->
    Install the engine for cloud -> Install the monitor
- Launch the pipeline into the cluster through the monitor command
ngs@server:Monitor$ java -jar monitor.jar launch ir3.json
- The previous command with generate a pipeline
id. Assume in this example that the id is 3. - Consult the status of the pipeline by its id
ngs@server:Monitor$ java -jar monitor.jar status 3
- After pipeline is finished, it is possible to download its results from the cluster to a previously defined directory inside the
Monitordirectory.
ngs@server:Monitor$ java -jar monitor.jar outputs 3 resultsDirectory3
resultsDirectoryis the directory that contains a copy of the outputs that where previously specified by the analyser that should be copied;3is the pipelineìd
For more information about the analyser and monitor commands and its parameters, please see section
Engine->Engine for cloud->Run the engine for cloud
//: # ( ##A pipeline using split and join tools (for executing only with Engine for Cloud) )